Showing posts with label makeup. Show all posts

9.27.2013

Beauty Letdown: CoverGirl Clump Crusher Mascara

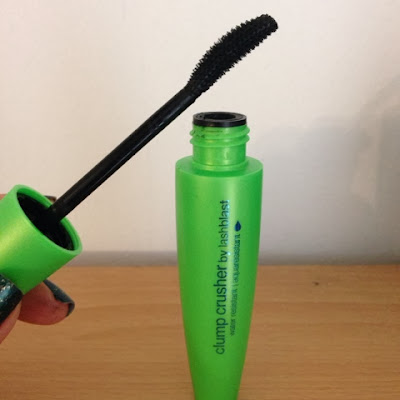
After cleaning out some of my old mascaras that I rarely used, I decided to purchase the CoverGirl Clump Crusher to replace my now diminished mascara collection. I used to be a big fan of the waterproof version of the original LashBlast so I decided to give this one a try. I have both the original and the "water resistant" versions but today I will be talking about the water resistant version.

Like the original LashBlast, it comes in a large brightly colored tube. I actually find the packaging quite adorable so I have no complaints In that department. The color I chose was Very Black because I prefer having dark, sometimes dramatic lashes. The brush is perhaps my favorite part of the whole thing. It combs through my lashes leaving it clump free no matter how many coats I pile on.

It seems like I'm raving about the product right? However, this is where my love for it ends. The formula is where this product falls flat. It's a bit too heavy for my lashes and makes them wilt like little sad flowers. I can get a great curl using my Shu Uemura lash curler and this mascara negates any curl I've created. Another gripe about this mascara is the water resistant part. It doesn't seem very water resistant at all! If I tear it will smudge. I don't know why CoverGril insists on creating this water resistant formula when their waterproof formulas have been some of the best mascaras I've tried. The curl doesn't drop and there is no smudging whatsoever.
It definitely is a lengthening mascara, as you can see from the eye photo. However you can also see how my lashes do not look curled at all. Overall, this was definitely a beauty letdown that I would not repurchase. If you have straight lashes or Asian lashes, stick to waterproof formulas and keep far away water resistant ones because there is a huge difference. If you have no issues with curl or smudging this will probably be a great mascara for you. 

Pros:
-Cute packaging
-Great brush
-Lengthens lashes

Cons:
-Not very water resistant
-Does not hold curl
-Smudges
-Does not create volume

Repurchase? No

3.27.2013

Review: Maybelline Color Sensational Vivids in Shocking Coral and Vivid Rose

A makeup post! Ermahgerd! I know I'm a little late with these Maybelline Color Sensational Vivids but late is better than never. I was already a big fan of the regular line of the Color Sensational lipsticks so I figured I would have an affinity towards these. Bright lipsticks can sometimes be the perfect accessory to complete a look and these are perfect for anyone who wants to experiment some louder colors without spending a ton of money.

It was a tough decision for me to settle on only two, but I picked the two that I thought would best compliment my teeth and skin tone. I may venture towards the Electric Orange in the summer when I'm tanner but I will settle for these two for now. There are a total of 10 permanent shades in the Vivids line. 


Shocking Coral and Vivid Rose
I'm in love with these. They don't dry out my lips and go on opaque and smooth. I find no issue with the product settling into lines. There was only one issue when it came to one of these lipsticks for me. I think depending on the pigmentation of your lips, the color may appear different. For example, Shocking Coral is suppose to be a bright coral red, but it pulls quite pink on me. It looks more coral in the tube than it does on my lips, which makes me a little sad but I still love the color. Vivid Rose is pretty true to color on my lips. It's a great choice for girls who don't want to go with red but want a bright lip!

Pros:
-Bright, opaque color
-Reasonably priced
-Variety of bold shades
-Creamy feeling
Cons:
-Has the same scent as regular Color Sensational lipsticks so if you hate those, you'll probably not like these
-Some may find the packaging tacky
-Colors may pull differently on different people

2.18.2013

Makeup Revisited: Maybelline Color Sensational High Shine Gloss

When Maybelline revamped their lip glosses, I ran over to the drugstore and purchased the four that appealed the most to me. I tried them out and honestly, forgot about them and left them in my drawer. I guess they weren't that impressionable to me at the time because if I had loved them, they would've been constantly used. So I left them alone until about last week when I was cleaning out my makeup stash. I decided to give them a second chance.

I'm so glad I did.

I don't know what was wrong with me the first time I tried these because I'm loving these right now. Maybe I wasn't in a gloss mood at the time, but these are great glosses! There are 12 different shades, some have shimmer while some are cream finishes. Out of the four I have, Iced Chocolate is the only shade that has shimmer. If you want to check these out, I would definitely take a close look to see which ones are shimmer or cream. You can't tell from the swatches on the Maybelline website, (insert sad Panda face.)

According to Maybelline, these are wax free and contain honey nectar. I don't know about all that, but these don't dry my lips or make them peel like some other glosses I've tried. Another big plus in my book for this product.

I also love that these glosses are creamy but not tacky. If you hate the tackiness of MAC lipglasses, then I think you would love these. The scent is fruity and doesn't linger after you apply. Another plus for me with these glosses is the fact I can wear these alone or layer them. I definitely love layering them with my lipsticks, especially ones that are too bright or pale for me. My current favorite lip combo has been this:
 
MAC Viva Glam Gaga with Mirrored Mauve

If you are interested in these glosses I'd highly recommend you try them. They're not as raved about but the quality is great. I don't think I'll get any more shades, but I would definitely repurchase when I'm finished!
Have you tried the Color Sensational lip glosses? If so, which ones have you tried? Do you love them? Hate them? Please share!

Happy Monday!

11.19.2012

What's In My Travel Makeup Bag

I wanted to share with you guys this little gem I found at Fossil.  It's called the Key-Per Frame Cosmetic bag and I absolutely adore it. The version I got was at the Tinton Falls Fossil Outlet so I didn't pay the full price for it. It was about five dollars less I believe, not that much of a difference, I would have paid full price for this because I love it that much. Anyway, this little bag is a perfect fit for my handbags. It also packs a lot of crap too! I have to be careful and not go overboard cause it gets too heavy.

The bag itself is made out of coated canvas which means it's pretty durable. The interior is very fun and bright with the yellow backdrop and white polka dots. The latch frame adds an unique and nice touch, making it seem more like a clutch than your usually make up bag. Another positive about the bag? It comes with a mirror! There have been many times where I've forgotten my compact and have had to settle using my phone's screen as a mirror. While it gets the job done, it's definitely not as nice as a mirror.


Currently in my travel makeup bag: (Going clockwise)
-Crown Kabuki Brush
-MAC Prep and Prime Pressed Powder
-Hourglass Liquid Lipstick in Ballet
-Nivea Recovery Lip Balm
-L'Oreal Colour Riche Caresse in Merino Mauve
-Tarina Tarantino Lip Conditioner in Showroom
-MAC lipstick in Angel
-NARS Gloss Lip Pencil in New Lover
-Duane Reade brande scentless hand sanitizer
-Ulta Brand hand sanitizer
-Milani Liquif'eye pencil in Brown
-Stila Stay All Day Waterproof Eyeliner Pen in Black
-MAC Eyebrow Pen in Lingering
-Maybelline Lumi Concealer in Light
-Japanese blotting sheets

Happy Monday!! 

11.07.2012

ULTA 20% Off Today Only and Sephora VIB

If you guys have missed out on a chance to score some of your favorite beauty products during the ULTA 20% sale, you're in luck. For today only, you can get 20% off your ENTIRE ULTA purchase. I don't know about you, but that sounds mighty awesome to me!

Just enter the code, 84840 when you check out.

The Sephora VIB sale doesn't start till tomorrow but I just wanted to let you guys know about it. The sale runs from November 8th to the 12th and offers 20% off as well.
Well, whatcha waiting for?! Go shop!

5.22.2012

MAC Hey Sailor! Haul

MAC's Hey Sailor! Collection is still not available at counters, but you can find the products at the MAC cosmetics website and at their freestanding PRO stores. Every year MAC launches a beachy/nautical themed collection and each year, they manage to sucker me in. This is a 40 piece collection, pretty large if you ask me! Out of everything that I picked out, I'm pretty excited to use the highlighter and lipsticks (surprise, surprise). Anyway, here's the haul. I didn't swatch the lipsticks and lipglass on my lips because I have a cold and I didn't want to display my ridiculously red nose.

12.16.2010

My Version of Aronofsky's Black Swan

"I had the craziest dream last night about a girl who has turned into a swan, but her prince falls for the wrong girl and she kills herself. " ~Nina from Black Swan

Who would you be? The Swan Queen, pure, innocent and true? Or would you want to be the Black Swan? The one that seduces, allures, and manipulates?

I tried out this look today cause I've been dying to see this movie. It was fairly easy to create the look. There are a few different tutorials on how to do it. I realized that my version looks different because I have more space between my brows and eyes that Portman does in her photo. Anyway, hope you guys like, I feel I look kinda creepy haha. And I do have a top on ^^


Peace out Boys and Girls!

7.15.2010

Classic Beauty

As a very early birthday gift, my fiancé's father gave me the Sony eReader and I was so excited to use it. I had used John's Nook and fell in love with it because of the simplicity and the convenience of it so when his Dad gave the Sony eReader to me I was super happy. Now the task at hand was what book to pick because it's expensive! I'm super picky about what books I read because to be honest, I get bored easily. I finally decided, after much searching, to purchase this book:
I had originally wanted get her biography BUT according to the reviews and other articles, a lot of the facts and stories were fabricated and very untrue. I wanted to know the real stories behind this classic icon. I'm about halfway through the book now and to be honest, Marilyn Monroe's (Norma Jeane Mortensen Baker's) life was not very glamorous at all. Her troubles started since she was born and just continued to work against her till the day she died. I'm sure a lot of people knew that Marilyn had her problems, but the author goes into great detail. I feel as if it's a fiction book even though it's not. Sad and tragic. I could probably go on and on about her life, but this isn't what this entry is about. It's about my current obsession with her beauty and makeup secrets!
 
 Regardless of her troubles and issues in her personal life, one thing was certain: she always looked amazing! The author constantly inserts people's reaction when they saw MM and how each thought she was stunning. This made me want to go and find out her secrets because deep down inside I wanna look as gorgeous and timeless as Marilyn!
I found out lots of her secrets and the products that she used, and many people don't know that she used to do her own makeup (though she did have her own personal makeup artist, Allan "Whitey" Snyder.) By doing her own makeup Marilyn knew just how enhance her best features on her face.  Her favorite brands were Erno Laszlo, Elizabeth Arden, and Max Factor, all brands that can still be found today! To keep her skin flawless she always used some sort of protector on her face. There have been reports that she even used Olive Oil! An easier and more pleasant smelling alternative that she used was Nivea Cream in the Tin Can. Not the one in the plastic tub...for some strange reason the one in the tin is better?

People have also said that she used to rinse her face 15 times with cold water to close her pores. I don't know how true that is though. When it came to prepping her face MM's routine was pretty straightforward: moisturize, foundation, concealer, translucent powder, and matte blush. She also had a technique to make her nose smaller using blush and vaseline. The process would be to powder the tip of her nose and dab vaseline on it repeating the process until she achieved a pixie shape nose to her liking.

Her technique to make her eyes pop was quite simple too, in fact it's so simple I think anyone can do it. 
Here's a run down:
1-She used a white shimmery shade stick all over the lid to the inner tear duct to her brow bone. (If you find that cream shadows crease or you just don't have any shimmery white bases just use a pearly white powder shadow. I really recommend Phloof!, Naked Pigment, or Vanilla Pigment by MAC)
2-She would then use a warm brown, a silvery blue, or even green to the outer part of her crease.
3-For her eyeliner, she would use liquid or fluid liner and line her eyes with the end sweeping out but not connecting the top and bottom. She would do a very narrow line on the top lashline and then the bottom. There have been also tips that have said she would do somewhat of a trapezoid shape to make her eyes appear larger. It is said that she rarely used black and used mostly brown/dark brown.
4-She would then use a white kohl liner and line her bottom lashline giving her a more wide eyed appearance.
5-Marilyn always used falsies, but instead of using the entire strip, she would cut them in half and only use half of it on the outer corner of her eye to give a more wide eyed look and fanned out appearance. Of course she curled her lashes and added mascara!

Here is a video to help you get started! I absolutely adored Kandee's video and interpretation:

Don't worry I didn't forget to talk about her lips! You would think that the lips would be the easiest right? Nope! This girl was not a swipe on and go gal. Infact she layered five different shades of red to achieve the shade that she wanted. FIVE! This is why just one shade of red just won't do. With her lips, there is a certain bout of depth of colors. Basically what she did was the same we do to our eyes. Adding different colors creates different kinds of dimension and depth. With her lips she used several different shades of red, each precisely applied with a lip brush to get her desired color.

How to get Marilyn's Lips
1-She would use a red liner and go out of her natural lip line to create a fuller pout.
2-Then she would apply three layers of different shades of red. (Her choices were Guerlain, Elizabeth Arden, and Max Factor)
3-Now the next step is important. In order to make her lips look more plump and full, she would apply her darker shades of lipstick on the outside and the lightest on the inner part of her lip. This added the dimension that she wanted.
4-She used a white highlighter on just the middle of her pout.
5-Gloss was her final step. (Though I have read that she would layer the gloss in her process as well. It would come out to be something like: liner, lipstick, gloss, shadow, more lipstick, highlight and gloss. That's a ton of work!)

I'm sure that there are a ton of other secrets that haven't been shared with us but the ones I shared with you I think are pretty nifty. She went with the basic things that flattered everyone. If you try this and it doesn't come out as wondrous as MM, remember it's all trial and error. Just because it worked for her doesn't mean it will completely work for you. Tweak the process to make it your own and shine! Hope you guys liked my little makeup article. Hopefully I will do more soon.

Disqus for My Beauty Blog

Affiliate Disclosure

Beauty is Not Caused is a participant in the Amazon Services LLC Associates Program and The Body Shop Affiliate Program. This means that these are an affiliate advertising program designed to provide a means for sites to earn advertising fees by advertising and linking to Amazon.com or TheBodyShop.com.

LinkWithin

Related Posts with Thumbnails